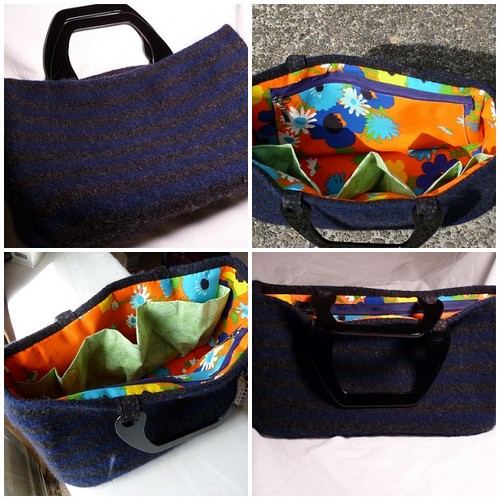
All night? O.K., that's a stretch, it was more like 10:30pm, after which I stayed up for at least another hour or so. This was my WIP wrestling project for the Ravelympics, and I'm really glad that it's finished. I first (and last?) posted about this in my first blog post, which I wrote shortly after finishing the felting. That was over two years ago--this bag only needed a lining and handles, but I've sucessfully avoided it since then. The pattern is the Noni Carpet Bag (rav link) by Nora Bellows, and the yarn is Cascade 220.
I bought the handles is maybe March 2007, but wasn't able to locate them over the last couple of weeks. I finally decided yesterday that I would check Renaissance Yarns for another set of handles, and if they didn't have them I'd forget about finishing these before the closing ceremonies. Luckily, I found handles exactly like those I lost. All along, my plan has been to put together a photo tutorial on creating the lining. However, since I didn't really get started on this until maybe 7pm last night, I didn't take the time to photograph all the steps. I think that in the last couple of years, the void of "how to line a bag" has been more than adequately filled, so I don't necessarily have anything valuable to add in any case. Here's an outline of what I did for the lining, sans photos, in case I ever make another felted bag (and I really want another one, now that this one is done):
- draw a schematic of the bag pieces. In my case, there are five main pieces: bottom, 2 sides, front, and back. Add some seam allowance.
- cut a rectangle of plastic needlework canvas that will fit into the bottom of the bag, and baste it into place. Use thread that matches the bag, or don't baste all the way through.
- Take a piece of fabric that is big enough to use for your lining pieces, and iron on heavy-duty stabilizer to the back of it. I used a craft stabilizer, but not one of the super thick or extra super heavy kinds.
- Decide what you want for pockets, and attach them to the front and/or back. You could put a little pocket on the side lining, but I didn't do this. Make sure that the pockets are lined and sturdy enough to hold things.
- Sew the front, sides, and back into a rectangle, stopping about a 1/2 inch above the bottom of the bag on each seam. See if it fits into the bag. Mine was a little too big, so I increased the seam allowances on all four seams, and rotary cut some of the top off. Inexact? Yes. not really a problem, though, because the pockets were low enough.
- One the "box" fits into the bag, attach the bottom. The 1/2 of each seam that I left open make this a lot easier, but I can't really explain it without a photo.
- turn the top edge under to a height that makes sense for the bag, and iron it well.
- Attach the handles to the bag with fabric loops, making sure that it's all even-steven. I used the sewing machine to attach them, because I want them to stay attached.
- This is the very worst part--hand sew the lining into the bag. I know that my sewing machine could handle sewing this thick bag to the lining, but I don't think that I have the skills to make it look good, and the idea of ripping out the stitches was too much to tempt me.
I originally knit a giant red flower that will not match the lining, so I may eventually make another flower. If I really plan to use this, though, the flower might be a little over the top for my normal routine, so I'm fine leaving the bag relatively unembellished. The lining is from a collection of fabric that my friend N___'s mother was getting rid of, I think that it's perfect for this!
Done! Now I'm just waiting for my Ravelympics medal!
______________
Stayed Up All Night, But They Got it Finished Just in Time: "I Knew the Bride (When She Used to Rock & Roll)" (this is a recent version) by Nick Lowe.


4 comments:
That bag is amazing. I love it. Also, I was going to say in your previous post - never enough dachshunds. I have two myself and I can't get enough dachshund pictures or love. Your's are so very cute.
Great bag ... love the splash of color inside in contrast to the outside darks.
I love your lining! I always try to line my bags with fun/colorful lining! You did a great job!! :)
This is very cool!
Post a Comment